MAKING
BASES FOR DIORAMAS AND DISPLAY
Placing scale models on a base, even a simple base, makes the viewer of
any model look at it in “context”, showing the model in a realistic
environment. Be it a modeller who competes, or simply a person who is looking to
enhance their collection at home, bases bring a different dimension to how their
art is viewed. This article will not attempt to cover all aspects and techniques
of bases but rather will discuss a few ways that a modeller can approach the
subject. For a very balanced and comprehensive look at both bases and
groundwork, may I recommend the two following books:
“How
to Build Dioramas” by Shep Paine Kalmbach
books ISBN 0-89024-551-7 (old
edition)
“How
to Build Dioramas” by Shep Paine Kalmbach
books ISBN 0-89024-195-3
(revised 1999)
“The
Art of the Diorama” by Ray Anderson
Kalmbach books ISBN
0-89024-092-2
Both of these books are generally available from most well stocked hobby
shops, and don’t forget to check in the model railroad section of your shop as
there are many books dealing with scenery and groundwork that also apply to
aircraft modelling.
SIMPLE
DISPLAY BASES
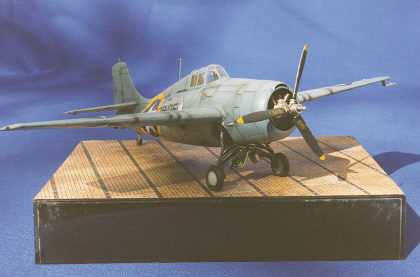
A versatile and economical way to display model aircraft is to use clear plastic “box frames” which can be found at craft stores, as well as mass marketers like Target and K Mart. A good size for 1/48 single engine aircraft is 5”x 7”, these frames can be found at upwards of 12”x 14” as well for larger models. Be sure that when you find a frame you wish to buy that you check the sides, as any blemishes will be seen clearly. Avoid any frames with scratches or chips in them.
First step is to figure out what color you wish the sides of the base to
be. I prefer black as it goes with many types of groundwork and aircraft colors,
but other colors would look great as well. While at the craft or home
improvement store buy a can of Krylon or other fast drying paint and after
masking the OUTSIDE of the bottom lip of the frame spray the INSIDE of the frame
with the paint. It will take four or five light layers of paint for full
coverage, let this dry for an hour before proceeding to the next step. Once
removing the tape from the outside (to prevent overspray) you will find a high
gloss color due to the clear plastic being sprayed from the inside, much like
the bodies of radio control cars.
Now comes the fun part! Just what do you want
this base
to portray? A grassy field, or a desert environment? Maybe you need the deck of
a carrier or a concrete hardstand. There are as many ways to achieve what you
need as there are possible environments.
Here are a few options for carrier decks….. you can either paint the surface of the base to replicate a deck, or use a commercially available deck material like illustrated here (deck from card paper, Verlinden product). In this case I cut the deck paper roughly to shape and applied matte medium with a sponge for a smooth and even finish before mounting the paper onto the plastic base. Once dried I cut with a sharp X acto to the edges and weathered a bit, in an hour of work I have myself an interesting and inexpensive way to display any WWII U.S. Navy aircraft. IJN and U.S. Navy decks are intricate in that they have many features with which you have to replicate with paint, however an armoured deck like those found on FAA carriers can easily be achieved.
Ground techniques differ in that you can choose
a rather flat piece of ground, or even build up the groundwork a bit depending
on the effect you are looking for. Lets look at a base that replicates a grassy
airfield.
After
painting the interior of the frame and letting dry, mask the outside of the
upper lip just below where the groundwork will be. Then, apply some matte medium
with a brush or sponge to get a wet but even application. You can sprinkle some
very fine sand, or railroad ballast to replicate small rocks (be frugal here,
don’t overdo it!). Then, apply static grass over the wet matte medium, leaving
some spots a bit more sparse than others to replicate spots where the grass has
died off. Let dry for 15 minutes, then gently blow the excess static grass off
of the base.
Now, get your airbrush and spray an earth color where you want little grass. Don’t worry about being careful here as you want very little paint coming out, just enough to color what you are doing. Then, choose a good color for grass (lots of options here, going from yellowish green to brownish to green itself), with a few different colors being best to emulate natural grass. Once dry, take a wide flat brush and gently drybrush the top of the grass with a pale green or pale yellow to give a final highlight to the grass. Remove the masking tape from the outside lip and again, in an hours’ work, you have a base on which to display your favorite new model.
With practice you can really produce a lot of these bases in an
afternoon, and at a price of less than $2 for the 5”x 7” frame it is not an
expensive proposition. Of course I have only touched upon the simplest of
techniques here, you can really add a lot to these bases such as ground
equipment and the like. For building up a bit of groundwork you can apply
Celluclay to the top of the base before adding grass, this will take longer to
finish though. Also, a nice thing about these box frames is that you can easily
wire your model for working lights and keep the hardware for this under the top
of the base and out of sight as the bases are hollow.
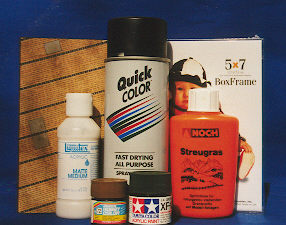
A list of materials for this type of base might include:
BASES
FOR DIORAMAS
When it comes to bases for dioramas there are many options, although I
like a more “formal” base made of wood. Places to find wood bases include
trophy shops, as well as craft and frame stores. Bases found at frame and trophy
shops generally can be used right away as is, starting with adding your
groundwork. When using a wooden frame, you will need to provide a rigid center
to the frame for support of the groundwork, such as some particle board or
plywood cut to shape. The advantage of using frames is that you can buy them in
many shapes and finishes, a nice oval or round base is always an attention
grabber. Frames are also a great way to go if you are using a commercially
available resin flight deck in either 1/72 or 1/48 as the resin deck will fit
right up inside the frame after cutting to size.
Before I go any further, a few thoughts on
planning a diorama. It is crucial that you do not lay out the model and other
components in a symmetrical fashion but rather random. This means that if you
are using a carrier deck scene, be sure that the planks on the carrier deck are
running at a different angle from the edge of the base, and again it helps to
place the aircraft model at a different angle than the direction of the deck to
avoid too many lines being parallel. Also, in many books you will read that you
must have the entire model within the boundaries of the base. I disagree with
this, as many dioramas I have seen (mine included) have “dead space” where
there is nothing happening. You want the base to help tell a story, or show off
a specific object or objects and when a base is too large the idea is usually
lost! Placing the model at an angle where the wings overhang creates interest
for the viewer.
Back now to choosing a base. The most
economical way to go is to visit your local craft shop and locate where they
keep their basswood supplies. These can be ready cut bases for a craft, to a
clock back. They usually come in many sizes and shapes and cost between $5 and
$12 depending on shape and size. The drawback here is the time spent preparing
the base, but it is very satisfying to make one of these come to life as well.
Start with a light sanding to remove any small imperfections and or dust.
Depending on how dark you want the base to be you can apply a balsa filler
(available at hobby shops) and sand smooth, this will give you the finest finish
but the filler once applied and sanded will prevent most stains from penetrating
the wood deeply. If you want a dark finish, skip the balsa filler but sand the
base in preparation for the stain anyway.
I like to use the Minwax line of stains and
varnish as it is readily available and rather inexpensive. Most home improvement
shops carry the line in the U.S. and I am sure there are equivilants around the
world. Follow the directions on the can, and be sure to wipe off the excess
stain. Once dry, I prefer to use the Minwax “Fast Drying Polyurethane” spray
varnish as it applies in light coats and comes in a high gloss, satin or dull
finish. From start to finish you are looking at about one full day at a minimum
to have your base ready, but it sure beats paying four times as much for a
custom made wooden base you may have to order anyway.
Now that you have a base ready for groundwork
the techniques are similar to the plastic display bases. A list of needed
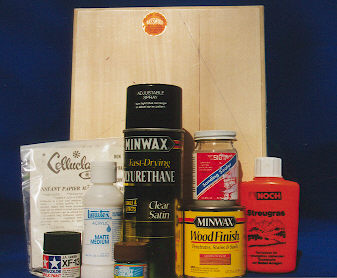
supplies may look like this:
Here is where having the books I mentioned above, or model railroading
books/magazines helps the modeller. A basic diorama base showing a grassy
airfield would start with Celluclay (or Durhams’ Water Putty) applied on the
display area, followed by appropriate coloring and static grass like explained
in the previous section. If your model needs to be securely fastened to the base
now is a good time to drill holes in the bottom of the base for a rod or other
attachment point. You can build up the terrain as needed by using wire forms or
foam and build the groundwork over this. A key factor here is experimentation
and patience, everybody finds their own special methods they like best! For
instance, I like to add a lot of white glue to my Celluclay mix as this enables
it to stick better to the base. Just like with airbrushing, people like using a
different paint to thinner mix so there is no “rule” here, simply mix the
material until you are happy with the results. One hint with Celluclay is to be
sure it has dried completely, which may take over a day in direct light, before
you apply colors and static grass, etc.
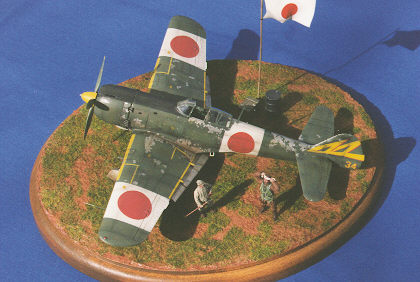
In the image of the Bf 109 diorama you can see
where I added cut wooden planks on top of the wood base before I added the
Celluclay, as well as making small depressions where I added some two part epoxy
to replicate puddles on the surface of the ground. The base of the Ki-84 diorama
is as simple as it comes with only soil and grass present, let your imagination
run wild when it comes to scenery and you’ll like the results!
One word on buying the supplies needed for
bases. It may seem like it is expensive, yet you would be surprised how far a
bag of Celluclay goes, not to mention a bag of static grass. Rather than buy all
the supplies at once look at it as a running project and when you see something
that may help you, buy it. I am still using supplies I bought in the 1980’s
and that will probably last me another 5 years minimum. You can build a simple
display base for under $20, and other than the base you actually use the other
materials will be sufficent for at least another dozen bases so it is very cost
effective!
I hope that this article will be a good basis
for many modellers to go out and try some of these techniques, not to mention
figure out new and better ones. In closing I would like to say again that the
investment in some of the books I mentioned earlier will be a wise one, as there
are many modelling techniques in them that will benefit all aspects of planning,
building and photographing models and dioramas. Try them and have fun!